
But using just paper and binder clips it's possible to make an even cheaper and even simpler light tent. And if for some reason you get beet juice on it, it can be recycled.
Start with three A3, 11" by 17", foolscap, B, tabloid or similar size medium-thickness pieces of paper. Then get 4 binder clips. In a pinch paper clips will work.
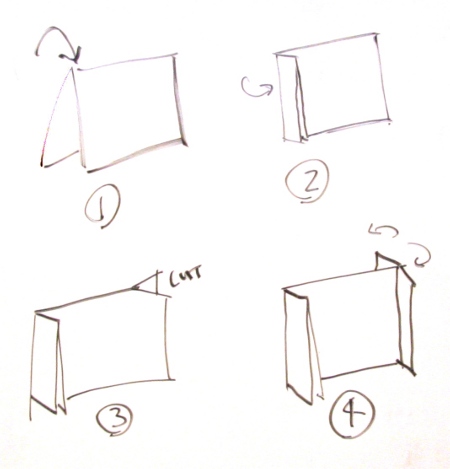
Take one of the sheets of paper and fold it in half lengthwise (1). Then make a roughly one inch fold on one of the ends perpendicular to the first fold (2). Cut a roughly 2.5 centimeter slit on the other end of first folded edge (3). Finally fold a T-shape with the slitted end (4). This is the first side of your light tent.

Attach a binder clip to the folded side near the T-fold side to clip together the edges of the paper that were formed with the very first fold.

Take a second piece of paper and fold it in half lengthwise (5). Then make a roughly 2.5 centimeter fold on one of the edges perpendicular to the first fold (6). Note that folds 2 and 6 mirror each other. That is fold 2 above is to the right while fold 6 is to the left. This step isn't critical but will result in sides that are mirror images. Once again make a roughly 1 inch slit (7) and T-shaped fold (8).

Attach a binder clip to the second side in the corresponding position as was used for the first binder clip.

Almost done. Take the third piece of paper and make a fold on one of the short ends of the page. This page will be the back and bottom of the light cube. The fold will be used to attach the paper to the sides and should be about thumb wide.

Take the two sides and position them in front of you with the T-folds away from you. The sides should be about a page width apart. The mirroring of folds 2 and 6 should be evident and in this case they fold out from the center of the light tent.

Use the last two binder clips to attach to the folded edge of the back/bottom page to the T-folds of the two sides. The folded edge of the back/bottom should sit on top of the slitted edge of the inner T-folds of the sides.
That's it.
There are plenty of variations. More binder clips can be used to add stability. Double folds can be used if the paper is thinner. Different colored paper can be used for different colored light tents. A fourth folded page can be added as a top. I typically shoot with indirect office lighting or reflected daylight so the four sided cube is adequate.

This light tent can also be scaled up and down. How else to take photos of your new light tent but inside of a larger light tent? Cheap railboard is great for larger versions. In the intrest of brevity, instructions for matryoshka light tents will not be covered in this post. Given the wide availability of paper and paper clips it's also quite handy to be able to construct a light tent as needed, especially when traveling, in a co-worker's cube or on the beach. It takes me about a minute to make one from scratch. The binder clips can be removed for lay-flat storage of the light tent. The resulting images, for example the composition below, are sufficient for many uses, even blogging.

And remeber if you get beet juice on your light tent it can easily be recycled.
Top Tweetbacks
idea เจ๋ง!, Interessante!!!, LOVE this!, Very cool, I can hear the McGyver theme music on this... , Been looking @ light tent tutorials, and I like this one, Surprisingly effective hacked together "light tent" for product photos..., ace!, An excellent "green" photo tip, Awesome, great how to that is rather "Doh" I had done the "back"..., nice!, and Brilliant!


overexposing the TTL metering, using a 18% gray card or using an incident meter is called for.
ReplyDeleteThe metering is left as an exercise for the reader. In this case, I wanted the highlights a little hot - I don't know about you but I like my beets slightly overexposed.
ReplyDeleteReally nice one.
ReplyDeleteIf you do not have an 18% gray card handy, you can also use a newspaper for metering, or your hand, if you do not have a newspaper.
ReplyDeleteAre you using any flash?
ReplyDelete...what is it?
ReplyDeleteNope, no flash for any of the above photos.
ReplyDeleteIt's an organic beat on an empty ink jet cartridge. It was for a post on measuring the spectrum of beet juice.
Great tent for small objects (maximum of 50cm of diameter). Any suggestion on how to increase the size?
ReplyDeleteWow, really nice and useful, thanks.
ReplyDeleteFor larger objects I've used larger (and thicker) pieces of railboard. I've also used extra rolls of paper & cut sheets to size (and folded the sides in half an extra time).
ReplyDeleteHow are you lighting this?
ReplyDeleteAnthony , the answer is he is lighting with ambient and shutter speed.... :)
ReplyDeleteCreate article - in fact it inspired me to have a go - flickr
ReplyDeleteCool, but I cannot see a light source.
ReplyDeleteIt might make it more 'permanent' than paper clips or binder clips, but you could use 'ticky tack' (that blue puddy that kindergarten teachers love). It would hold the folded wall shape and connect the walls together as well.
ReplyDeleteCall it aesthetic snobbery, but I don't like seeing the clips.
Just found your post and had to do some small food shots for work. Brilliant post, after playing around with lighting around my apt and adjusting exposure got some killer shots. Muchos arigato!!!
ReplyDeleteTIP: next thing you need is inexpensive postprocessing and better when it's free. here is one: http://2dbin.com/Autoprocess/fnikydqv
ReplyDeleteLove the build, I also create photo tent's.
ReplyDelete